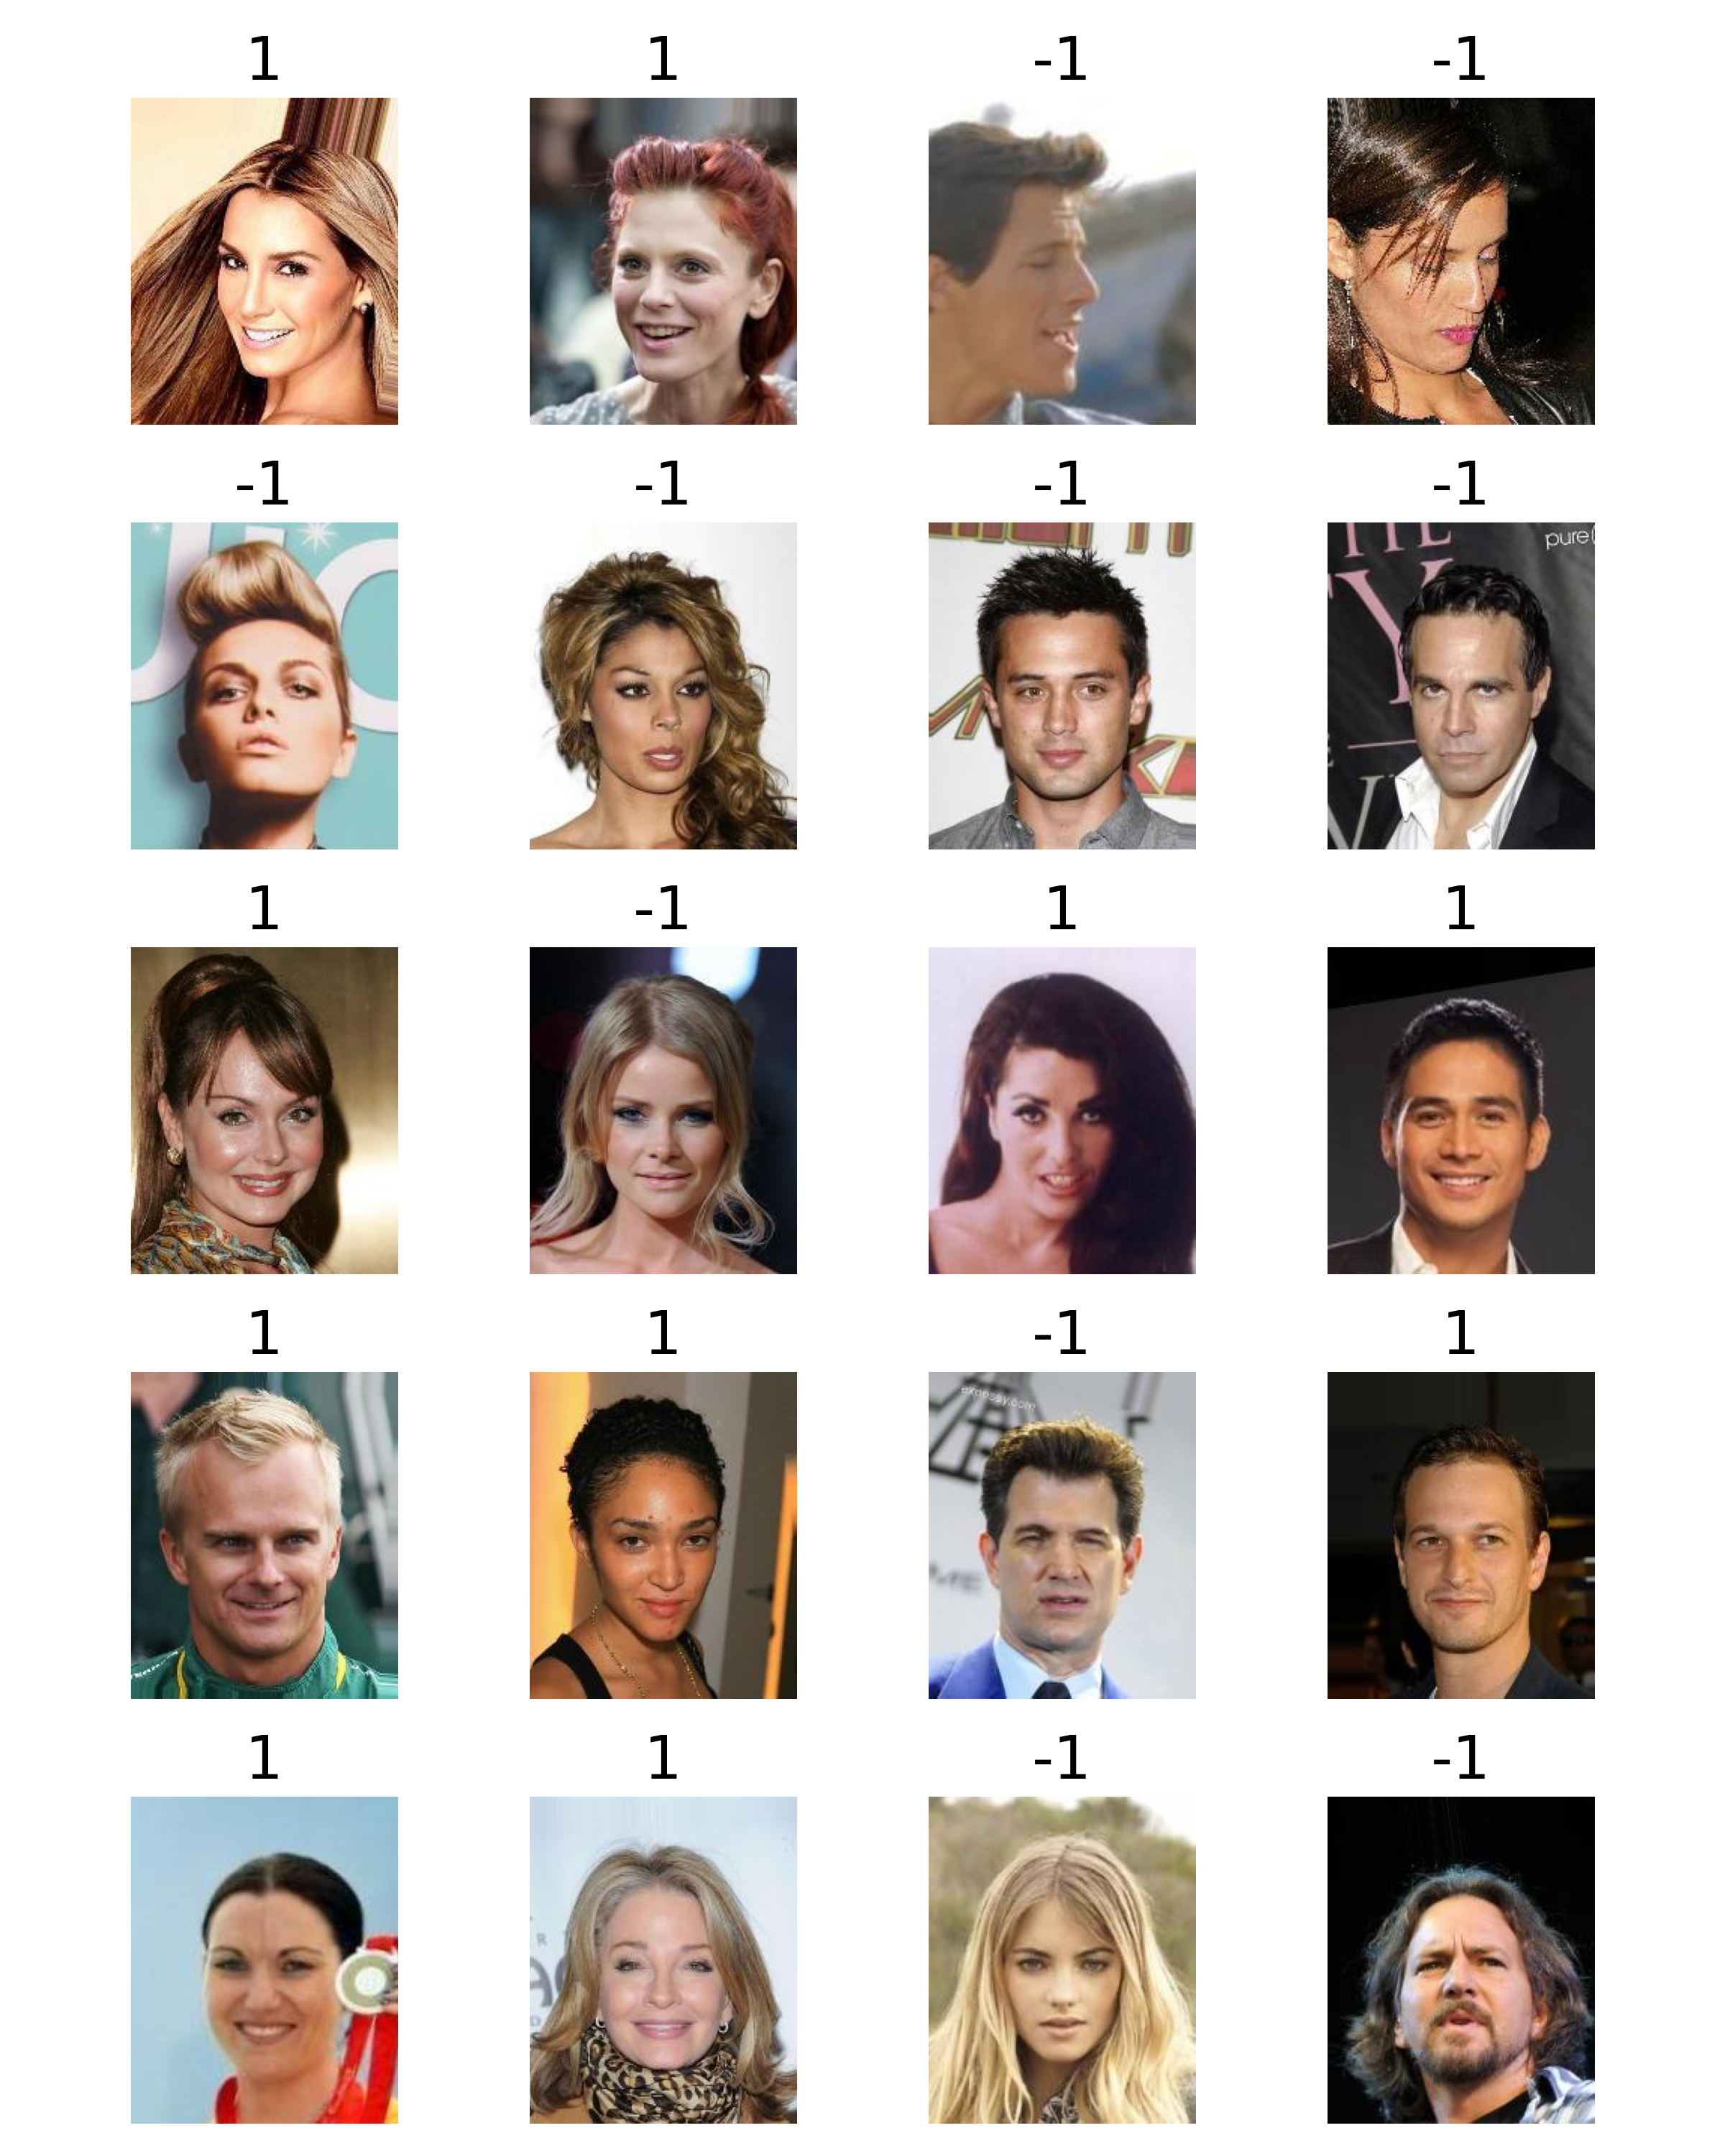
CelebA資料集收集了 202599張影視、政商名人臉部表情的圖檔,並依表情樣式給予各個圖檔40個不同標記。
rm(list = ls())
pkg <- c("data.table", "ggplot2")
sapply(pkg, require, character.only = TRUE)
setwd("~/Documents/Geron2017/tests/ch14_CNN/")

d <- fread("../data/celeba/Anno/identity_CelebA.txt")
dattr <- fread("../data/celeba/Anno/list_attr_celeba.txt")

nrow(d)
#  202599

corrected_names <- c("file_name", names(dattr)[2:41])
names(dattr) <- corrected_names
names(dattr)
#  [1] "file_name"           "5_o_Clock_Shadow"    "Arched_Eyebrows"
#  [4] "Attractive"          "Bags_Under_Eyes"     "Bald"
#  [7] "Bangs"               "Big_Lips"            "Big_Nose"
# [10] "Black_Hair"          "Blond_Hair"          "Blurry"
# [13] "Brown_Hair"          "Bushy_Eyebrows"      "Chubby"
# [16] "Double_Chin"         "Eyeglasses"          "Goatee"
# [19] "Gray_Hair"           "Heavy_Makeup"        "High_Cheekbones"
# [22] "Male"                "Mouth_Slightly_Open" "Mustache"
# [25] "Narrow_Eyes"         "No_Beard"            "Oval_Face"
# [28] "Pale_Skin"           "Pointy_Nose"         "Receding_Hairline"
# [31] "Rosy_Cheeks"         "Sideburns"           "Smiling"
# [34] "Straight_Hair"       "Wavy_Hair"           "Wearing_Earrings"
# [37] "Wearing_Hat"         "Wearing_Lipstick"    "Wearing_Necklace"
# [40] "Wearing_Necktie"     "Young"
資料集中有約48%的圖檔被判定帶有笑容。笑容的標記是:1 = 笑容,-1=無笑容。
round( table(dattr$Smiling) / nrow(d), 2)
# -1      1
# 0.52 0.48
直接印出圖檔來檢視
import numpy as np
import PIL
import PIL.Image
import tensorflow_datasets as tfds
import pathlib
import pandas as pd


data_dir = pathlib.Path("../data/celeba/img_align_celeba")
files = list( data_dir.glob('*.jpg') )
sorted_files = sorted(files, key=lambda x: x.name)
image_count = len(files)


dattr = pd.read_csv("../data/celeba/Anno/list_attr_celeba.txt", sep="\s+", skiprows=1)
file_names = dattr.index

smiling_column = dattr["Smiling"]
smiling_array = smiling_column.values

n_rows = 5
n_cols = 4
plt.figure(figsize=(n_cols * 2, n_rows * 2))

for row in range(n_rows):
    for col in range(n_cols):
        index = n_cols * row + col

        image = mpimg.imread(sorted_files[index])
        label_data = smiling_array[index]
        label = f"{label_data}"

        plt.subplot(n_rows, n_cols, index + 1)
        plt.imshow(image)
        plt.axis('off')
        plt.title(label, fontsize=20)

plt.subplots_adjust(wspace=0.2, hspace=0.5)
plt.tight_layout()
plt.show()

上圖顯示這些人工分類大致正確,雖然有一些圖片,如第一行第三欄、第三行第三欄及第四行第四欄等似笑非笑的表情確是難以分類。
使用簡易的CNN模型分類笑容
相較於Fashion-MNIST的圖檔,Celeba的圖檔較大(28 x 28 x 1 vs 218 x 178 x 3),但所需分類的類別較少(10 vs 2)。之前我們達到了88%的正確率,此範例展示目的有二:
- 測試是否相同的模型可以分類不同類別的圖檔,
- 測試同樣的模型對資料量較大的圖檔的表現。
- 展示批次處理方法,以應對GPU記憶體不足的問題。
之前我們使用了一個非常簡單的CNN模型,如下所示。
model = keras.models.Sequential(
        [
            keras.layers.Conv2D(
                filters=3,
                kernel_size=7,
                activation="relu",
                padding="SAME",
                input_shape=[28, 28, 1],
            ),
            keras.layers.MaxPooling2D(2),
            keras.layers.Flatten(),
            keras.layers.Dense(units=10, activation="softmax"),
        ]
    )
我們需將最後的輸出層改為,keras.layers.Dense(units=1, activation='sigmoid'),使用sigmoid函式,以利進行二元分類作業;此外輸入層中,告知模型的樣本各個維度的長度。
    model = keras.models.Sequential(
        [
            keras.layers.Conv2D(
                filters=3,
                kernel_size=7,
                activation="relu",
                padding="SAME",
                input_shape=[218, 178, 3],
            ),
            keras.layers.MaxPooling2D(2),
            keras.layers.Flatten(),
            keras.layers.Dense(units=1, activation='sigmoid')
        ]
    )
因為此資料集較大,一次將所有的圖檔資料傳送進GPU記憶體,會導致記憶體超載。因此我們僅使用前3,000張圖檔。使用批次處理的方式低階的GPU可以處理達5,000張圖檔。
nsample = 5000
# Load all images into a list of NumPy arrays
images = [load_image(path) for path in sorted_files[:nsample]]

# Convert list of arrays into a single NumPy array
dataset = np.array(images)
len(dataset), dataset.shape

cnn_model.evaluate(X_test, Y_test)
# accuracy 0.8764 - loss: 0.4565
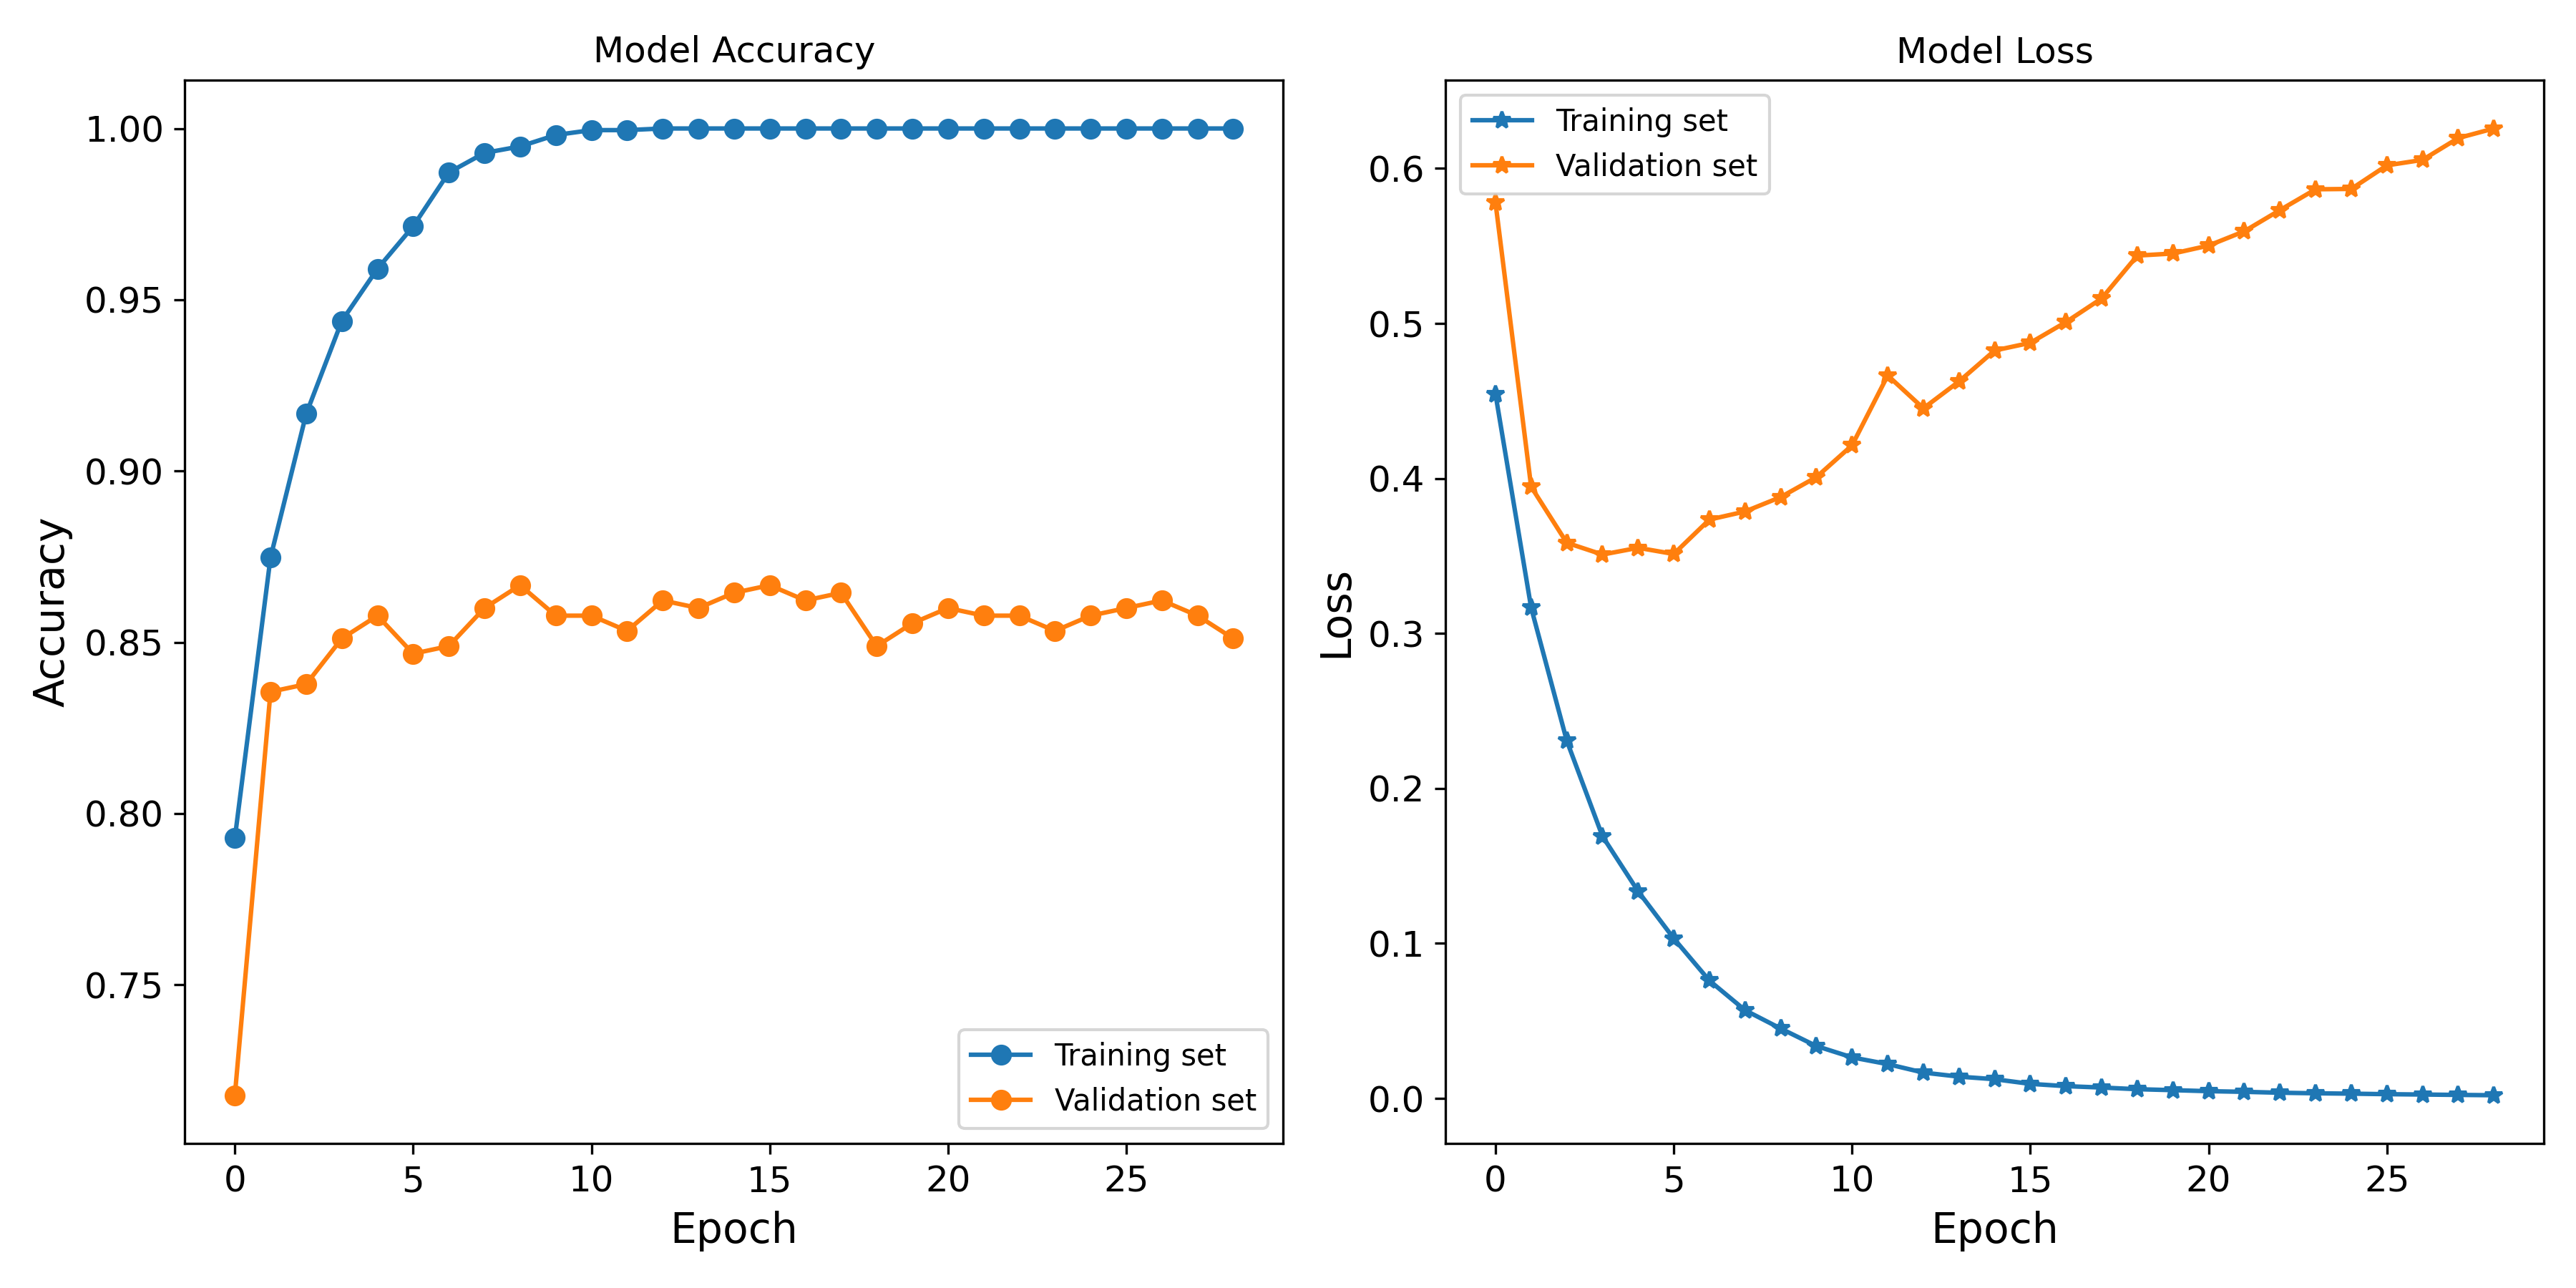
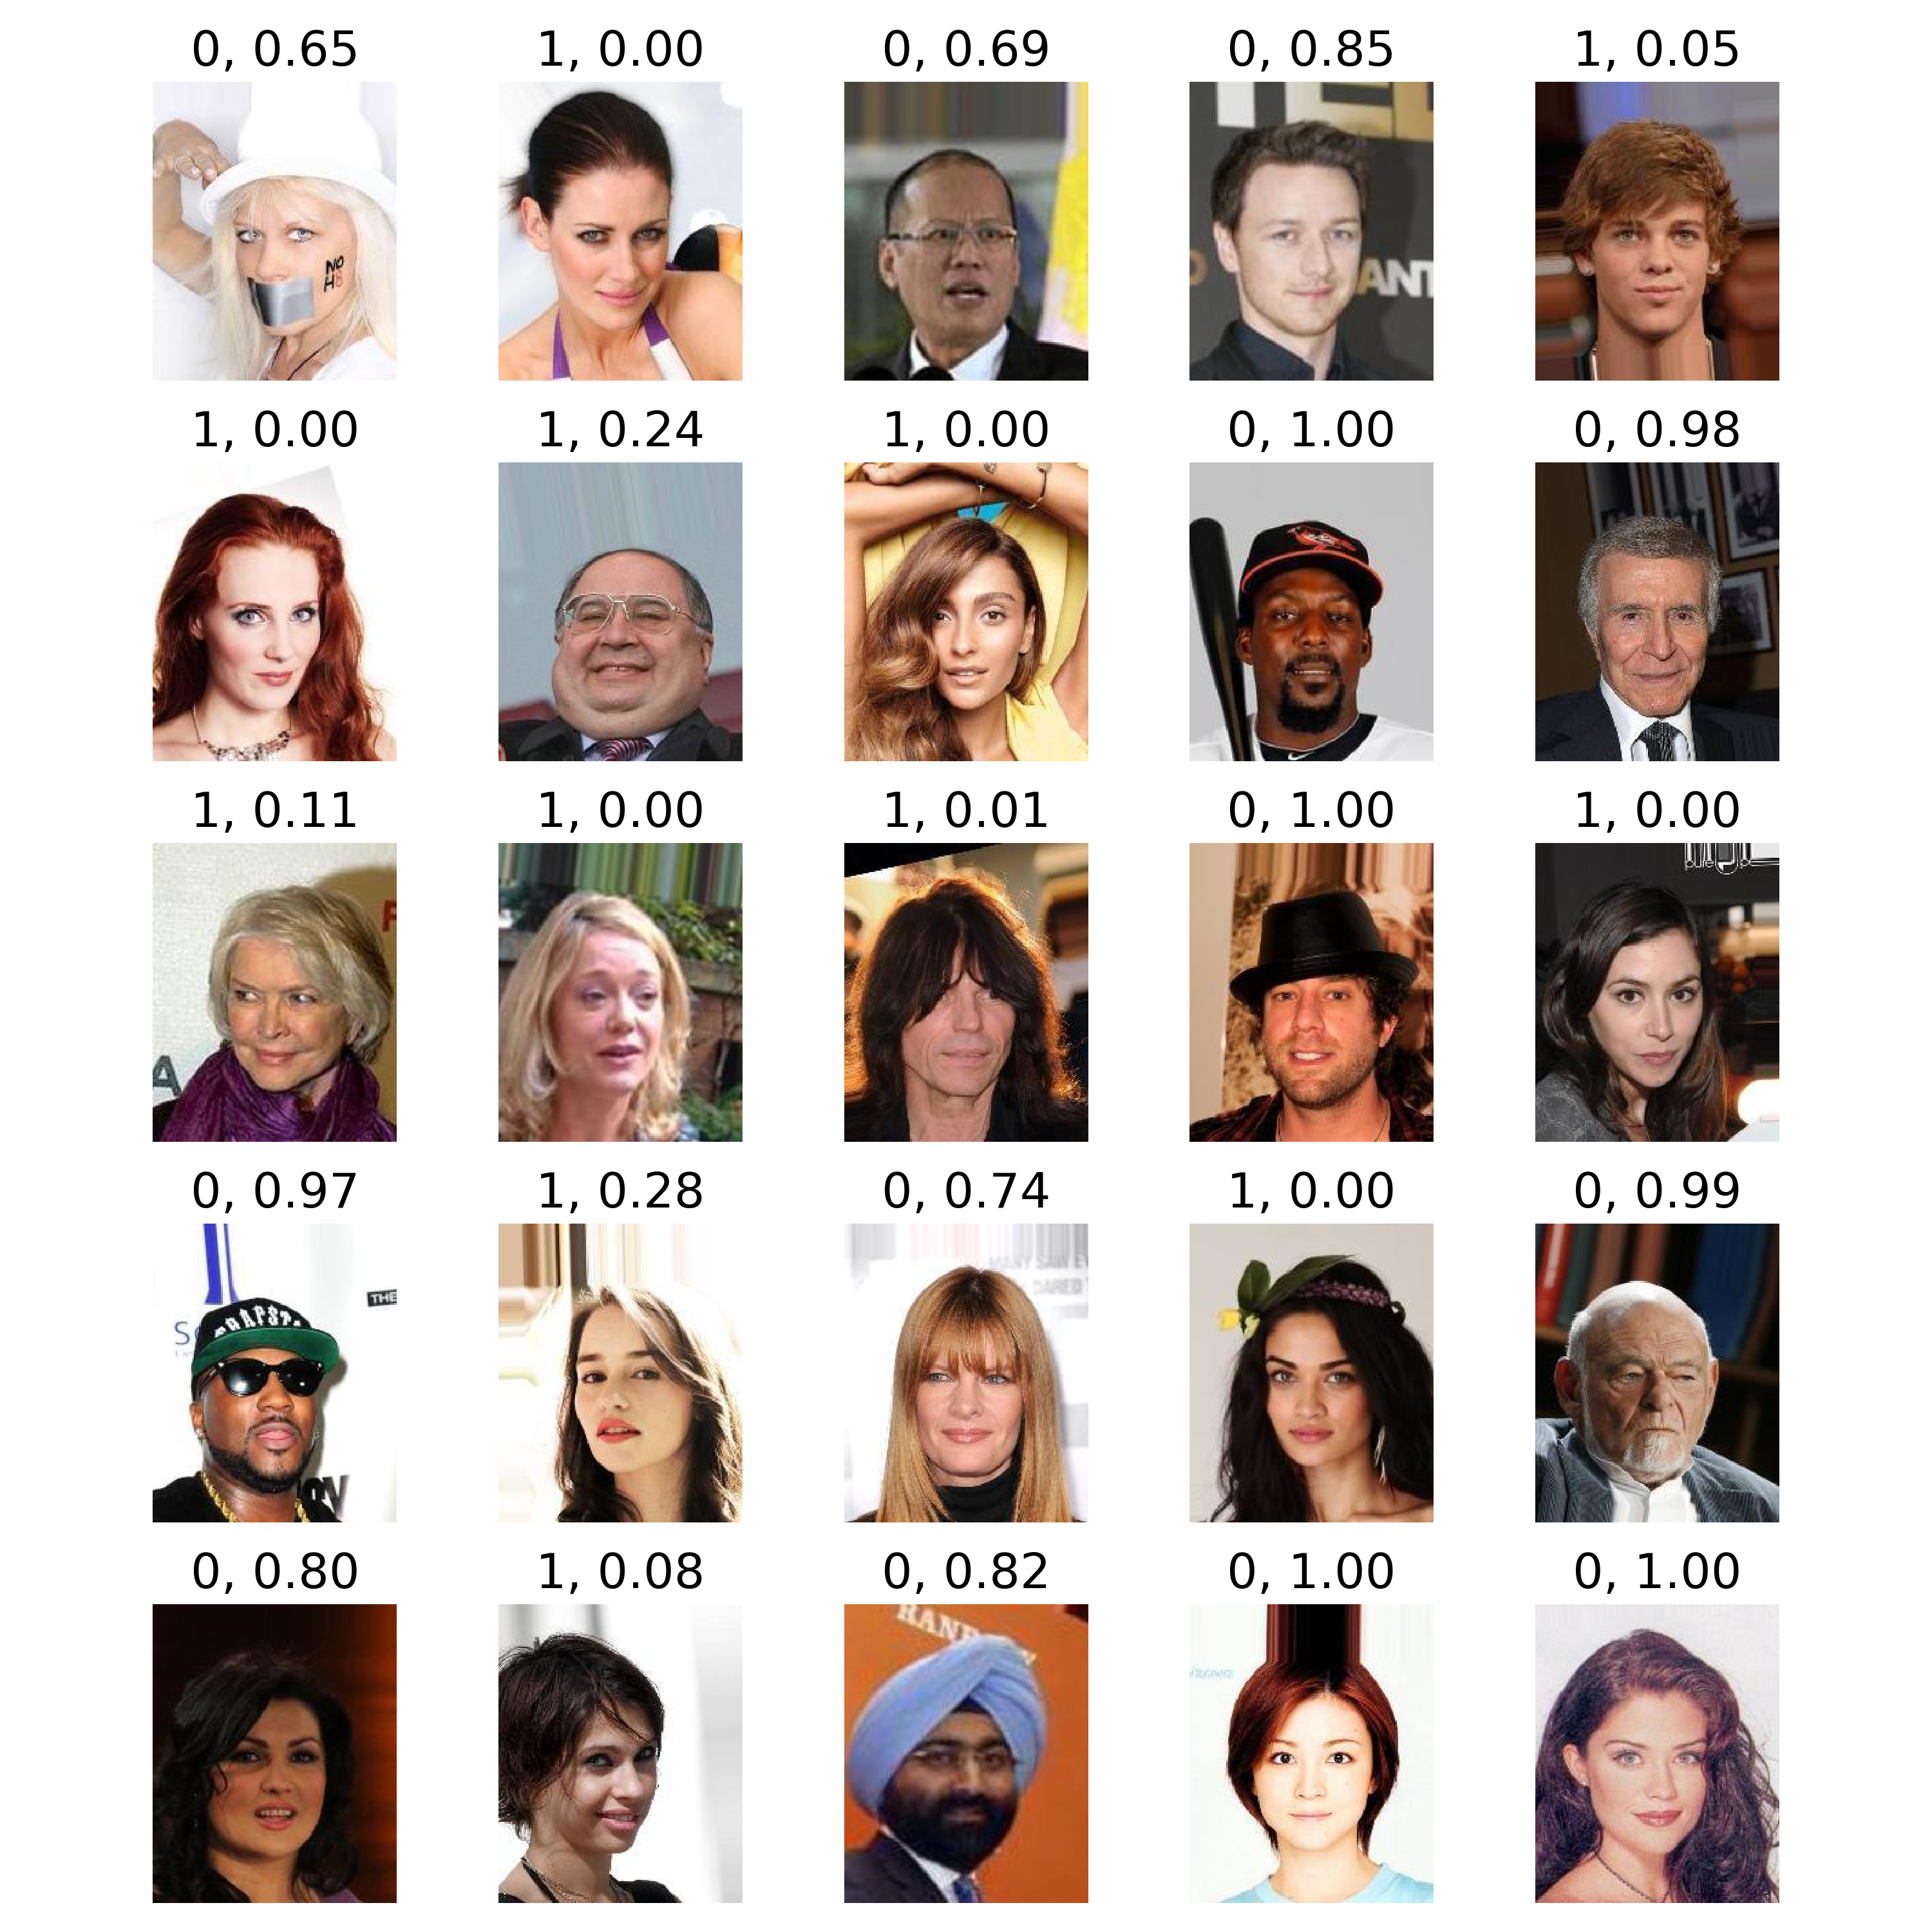
雖然驗證組及測試組的正確率達到近88%,驗證組的 loss 函數隨 epoch 數有愈增現像,指示著此簡易模型有Overfitting的問題。 下圖顯示CNN模型分類和人工分類的歧異,確實有些圖檔難以分類,例如第一排第一欄,第一排第三欄,但也有一些圖片或許模型應該可以做得更好,例如第二排第二欄及第四排第五欄。

小結
簡單的CNN模型已能有效分類圖像,但要達到近乎人工精準度的分類(>95%),模型複雜度必須提升。高解析度圖像加重了記憶體負擔,批次處理效果有限。之後的文章將討論如何透過資料增強(Data augmentation)和圖像裁切,試圖在提高模型精準度的同時,減輕記憶體壓力。
附錄
一、直接處理5000筆樣本的程式碼
import numpy as np
import argparse
from tensorflow import keras
import pickle as pkl

if __name__ == "__main__":
    # python3 fit_celeba.py "tmp_data/celeba_data.pkl" "models/celeba_history.pkl" "models/celeba.keras" --nepoch 30

    parser = argparse.ArgumentParser(description="Process MNIST data")
    parser.add_argument("data_path", type=str, help="Path to the data file")
    parser.add_argument("output_path", type=str, help="Path to the stored data file")
    parser.add_argument("model_output", type=str, help="Path to the model description")
    parser.add_argument("--nepoch", type=int, default=30, help="Number of epoch")

    args = parser.parse_args()
    DATA_DIR = args.data_path
    OUTPUT_DIR = args.output_path
    MODEL_DIR = args.model_output
    nepoch = args.nepoch

    print(f"Data path provided: {DATA_DIR}")
    print(f"Data were stored: {OUTPUT_DIR}")
    print(f"Model was stored: {MODEL_DIR}")
    print(f"The number of epoch: {nepoch}")

    with open(DATA_DIR, "rb") as file:
        X_train, X_val, X_test, Y_train, Y_val, Y_test = pkl.load(file)

    model = keras.models.Sequential(
        [
            keras.layers.Conv2D(
                filters=3,
                kernel_size=7,
                activation="relu",
                padding="SAME",
                input_shape=[218, 178, 3],
            ),
            keras.layers.MaxPooling2D(2),
            keras.layers.Flatten(),
            keras.layers.Dense(units=1, activation='sigmoid')
        ]
    )

    print(model.summary())
    print("Total number of the parameters is: ", model.count_params())

    model.compile(loss="binary_crossentropy", optimizer="nadam", metrics=["accuracy"])

    # history = model.fit(X_train, Y_train, epochs=nepoch, batch_size = 32, validation_data=(X_val, Y_val))

    history = model.fit(X_train, Y_train, epochs=nepoch, batch_size=32, validation_split=0.2)

    print("Evaluating the test set:\n")
    model.evaluate(X_test, Y_test)

    with open(OUTPUT_DIR, "wb") as file_obj:
        pkl.dump(history, file_obj)

    model.save(MODEL_DIR)